Have a Question?
Get in Touch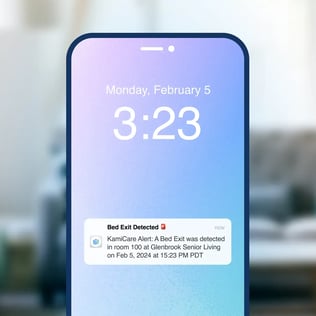
Effective notifications are key to ensuring rapid response in KamiCare. Whether you want alerts via phone call, text, email, or the KamiCare mobile app, you can customize notification rules to fit your facility's needs. Below, we’ll walk you through the setup process, explain all the options available, and share best practices used by most of our customers.
Understanding Notification Features
KamiCare offers a variety of notification options and rules to customize alerts for your specific needs:
Delivery Options
- Phone Call – Ideal for immediate and urgent alerts.
- Text Message – Great for quick visibility without requiring app access.
- Email – Useful for documentation and non-urgent alerts.
- KamiCare Mobile App Notification – Recommended for real-time alerts directly within the platform.
Notification Rules
- Group-Based Notifications – Assign notifications based on room groups. For example, a notification rule can be set up so that only cameras inside the “North Hall” group send alerts to the North Hall watch-person.
-
-
- You can create a rule that applies to multiple groups. For example, Floor 2 group and Floor 3 group can be included in an “Upper Floors” rule
-
- Select Schedule – Manually set a schedule for your rule. This schedule dictates the time in which your rule will be applied. This can be 24/7 or a specific window, such as 10pm - 8am, covering bedtime.
- Select Events – You can choose to only receive notifications for Bed Exit or Fall Detection events, or both.
- Escalation Levels – Alerts can be configured to escalate if not acknowledged within 1 minute). Each escalation level can be customized to receive any combination of phone call, text, email or KamiCare mobile app notifications.
- Multiple Recipients per Level – Each escalation level can notify multiple people simultaneously.
Step-by-Step Guide to Setting Up Notifications
Note: Notification preferences must be updated in the Web App. If you are using the Mobile App, please switch to a tablet or computer to navigate the Web App.
- Log into KamiCare and navigate to the Groups tab.
- This is where you can create custom room groups. First, select Create Group in the top right corner
- Next, set a group name (e.g., “Second Floor”). Make sure that the name is meaningful so it’s easy to interpret.
- Finally, add the rooms that you want in the group, and click Create Group.
- Next, navigate to the Notification Rules tab.
- You will see three dropdown options: Schedule, Receivers, and Rules.
- Schedule: This is where you can set custom Schedules for your notifications. You can choose to have alerts sent 24/7, or customize it for “morning shift” and “evening shift”, for instance. First, select Add Schedule in the top right corner, then set a start and end time.
- Receivers: This is where you can set the contact information for people who you want to receive notifications. First, select Add Receiver in the top right corner, then add a name, email address, SMS and phone number for each contact.
- Rules: This is where you can set your custom rules for notification preferences. Here is a detailed guide for setting up a new rule:
- Click “Add Rule.”
- Name your Rule. Make sure that the name is meaningful so it’s easy to interpret.
- Select your Schedule:
- Select the schedule that this rule applies to (e.g., “Morning Shift”). This will be chosen from one of the schedules that you created earlier.
- Select your Group(s):
- Select the room group that this rule applies to (e.g., "North Hall"). This will be chosen from the groups you created earlier. You can also select All if you want to select all cameras, or if you didn’t create any groups.
- Choose Event(s):
- Select the type of events that should trigger a notification. You can select Fall Detection, Bed Exit, or both.
- Select your Receiver(s) at each Escalation Level:
- Select the people at each escalation level that you would like to receive notifications from the receivers that you created earlier.
- Level 1: Add key responders (e.g., caregivers, nurses) and select notification methods (e.g., phone call + app notification).
- Level 2 (optional): Add backup staff and select text + email notifications.
- Level 3 (optional): Add administrators and repeat notifications if needed.
- You can select any combination of notifications for each level, but at least one notification type must be selected.
- Add the Rule
- Ensure all selected recipients have the KamiCare app installed and notification permissions enabled.
- Test the rule to verify correct delivery.
By following these steps, you’ll ensure that critical alerts reach the right people at the right time, minimizing response delays and improving resident care. Need further customization? Explore additional settings in your KamiCare dashboard!

